I want to dedicate this post to all my technologies! You know who you are!
I rented all of my filming equipment from BECON-TV, the Broward Schools Television Station. I rented a Sony DSLR, a tripod, lights and their stands, and microphones. I chose to do this because, as I mentioned in my blog, I did not necessarily focus on cinematography, as the opening was all “found-footage” from the point of view of the couple. This year, I wanted to challenge myself and work with more technologies, rather than just my iPhone camera. Having the option of using a tripod was interesting, because I knew that there were specific shots where I wanted the camera to be steady, but there were others where I wanted to film guerilla style. Using the equipment was an amazing hands-on learning experience, as I was given a run down on how to adjust the shutter speed, the ISO, and the frame rate- which we actually used and manipulated throughout filming. I feel much more comfortable around professional cameras and other equipment as a result of this project.
Last year, I edited using Adobe Premiere Pro but the program presented some problems for me throughout the year. So, I took to the internet and researched the best film-editing softwares for students- and I found DaVinci Resolve. It was very odd relearning to edit with a different software, as both are completely different. Premiere was slightly easier to use, surprisingly, because all effects, transitions, and filters were sorted into easy to access libraries and almost all post-production could be done within the same page. With DaVinci Resolve, everything is scattered about and there are multiple, more specific pages to complete post-production. This format results in being able to manipulate the footage much more, creating a better result. Within Resolve, I was able to place a gold filter and old film effect on the flashback sequences, and I was able to clearly trim clips to the short pace I wanted. I also tried chroma keying, using glitch text, and more within the program. I hope to continue to use this software so I can become more proficient in it, especially since the software has so much to offer.
To create my website, I used Wix. I’ve made one other website with Wix previously, but for a business- not a film. I chose a template for a “film” website, and changed all aspects to better serve my film- for example, I included a dynamic dark rain-cloud background and large uniform gold fonts. On the website I created pages where the audience can explore the synopsis, read reviews, learn more about the cast and crew, and view production photos. Using Wix was slightly frustrating, as the website frequently lags and doesn’t respond, but the end result always looks phenomenal. I don’t know if I will use Wix again in the future, because I feel as though there are other resources that will produce a quality output without the frustration of creating it.
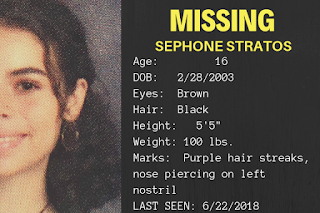
To create my postcard, I used Canva, a free graphic design website. I might be Canva’s biggest fan- I use it for my personal social media! I searched through templates until I found the one I wanted and customized it. Canva has its own design elements that are free to use and lets you upload your own media as well. I uploaded the pictures of one of the actresses and a different font type to make the postcard look like a realistic missing persons flyer. I will always sing the praises on Canva, as it allows you to make so many designs specific to what you are looking for. I find it to be easy to use, efficient, and one of the best resources I have when developing my media.
Finally, to edit my production photos, I used the Adobe Photoshop Mix app for the iPhone. I always enjoy using this app, as everything is laid out and easy to use. I was able to cut away backgrounds for the pictures you see on the postcard and website and was able to manipulate the brightness and color of certain pictures to further develop the characterization of the film and it’s cast.

No comments:
Post a Comment